Before we dive into the rhythm of making okonomiyaki, let’s set the stage with what can elevate this delightful dish. Okonomiyaki pairs beautifully with a fresh salad, especially one loaded with vibrant veggies.
Think crisp cucumbers or juicy cherry tomatoes—we need a little crunch to balance that savory pancake. Also, consider serving it with a side of pickled ginger or some spicy mayo for an exciting contrast. And don’t forget a cold drink—perhaps a refreshing iced tea or a light beer—that’ll complement the flavors perfectly.
What is Okonomiyaki?
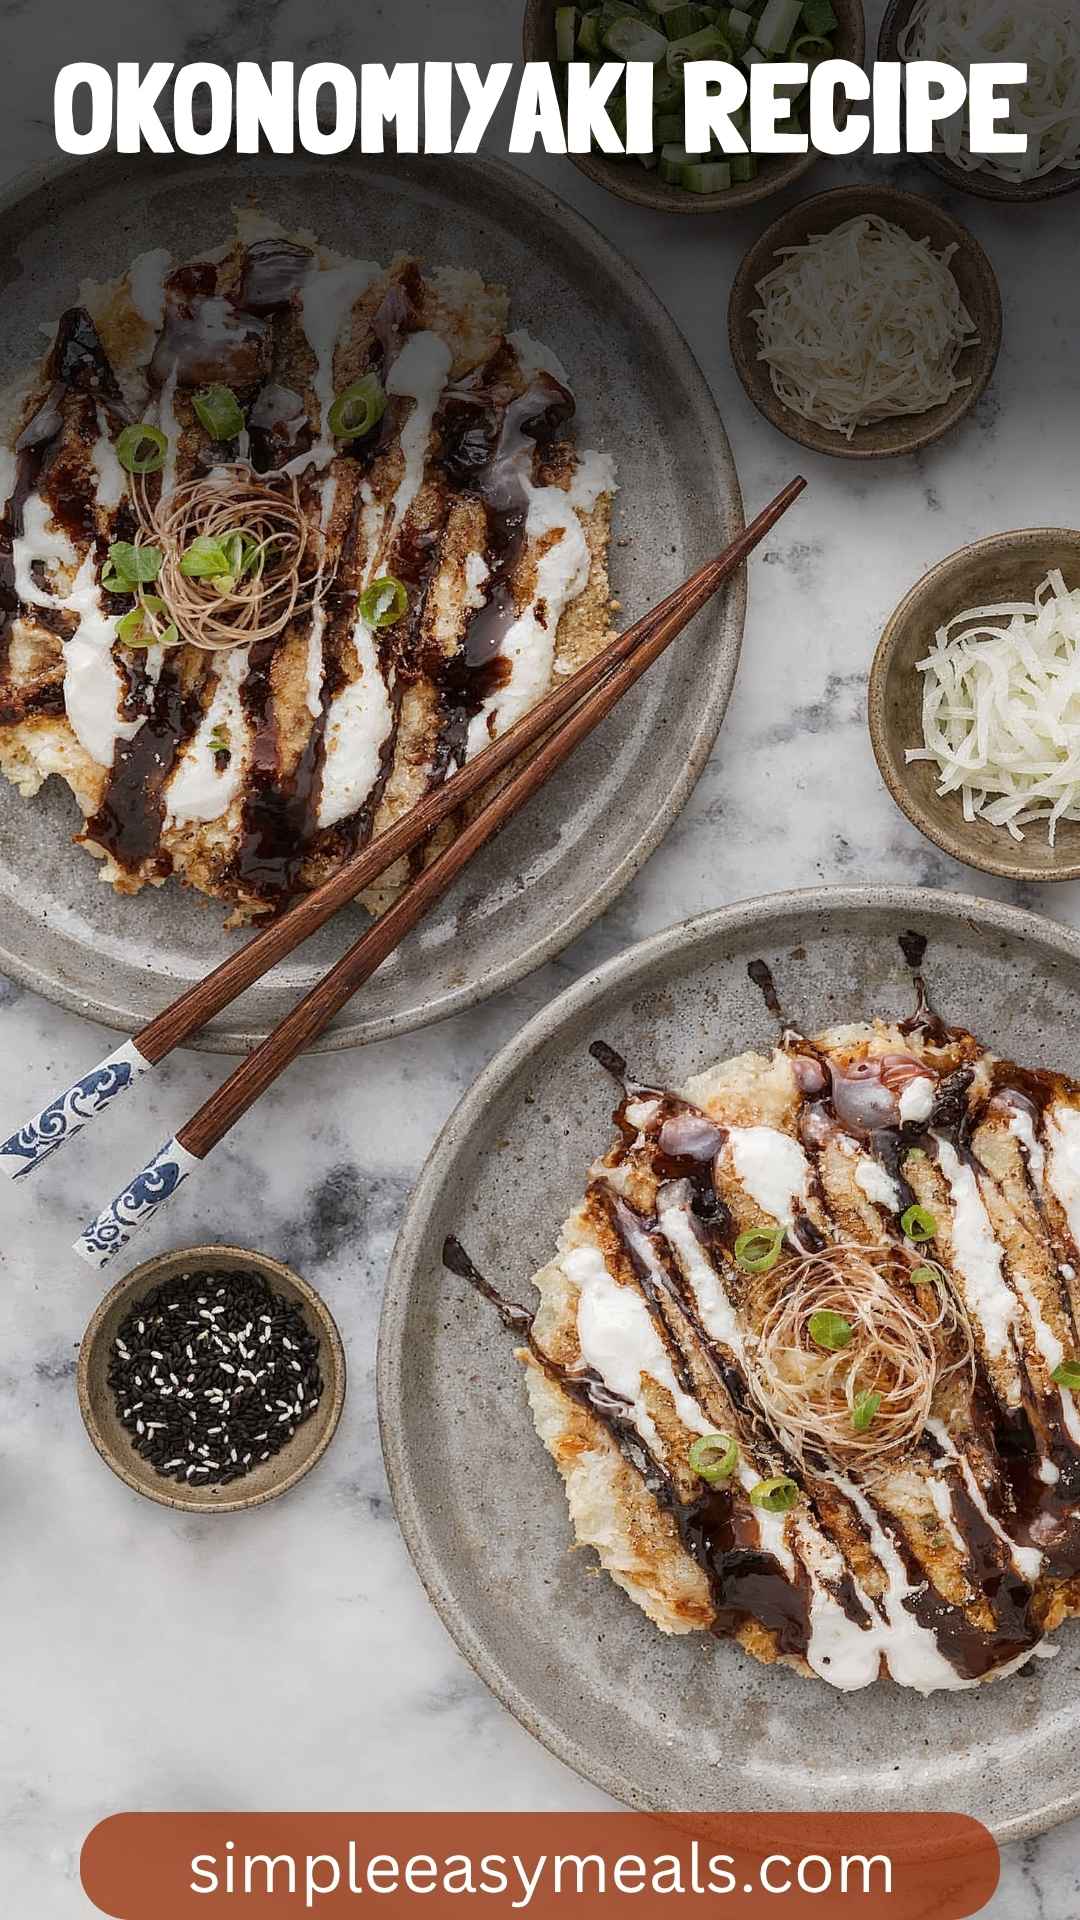
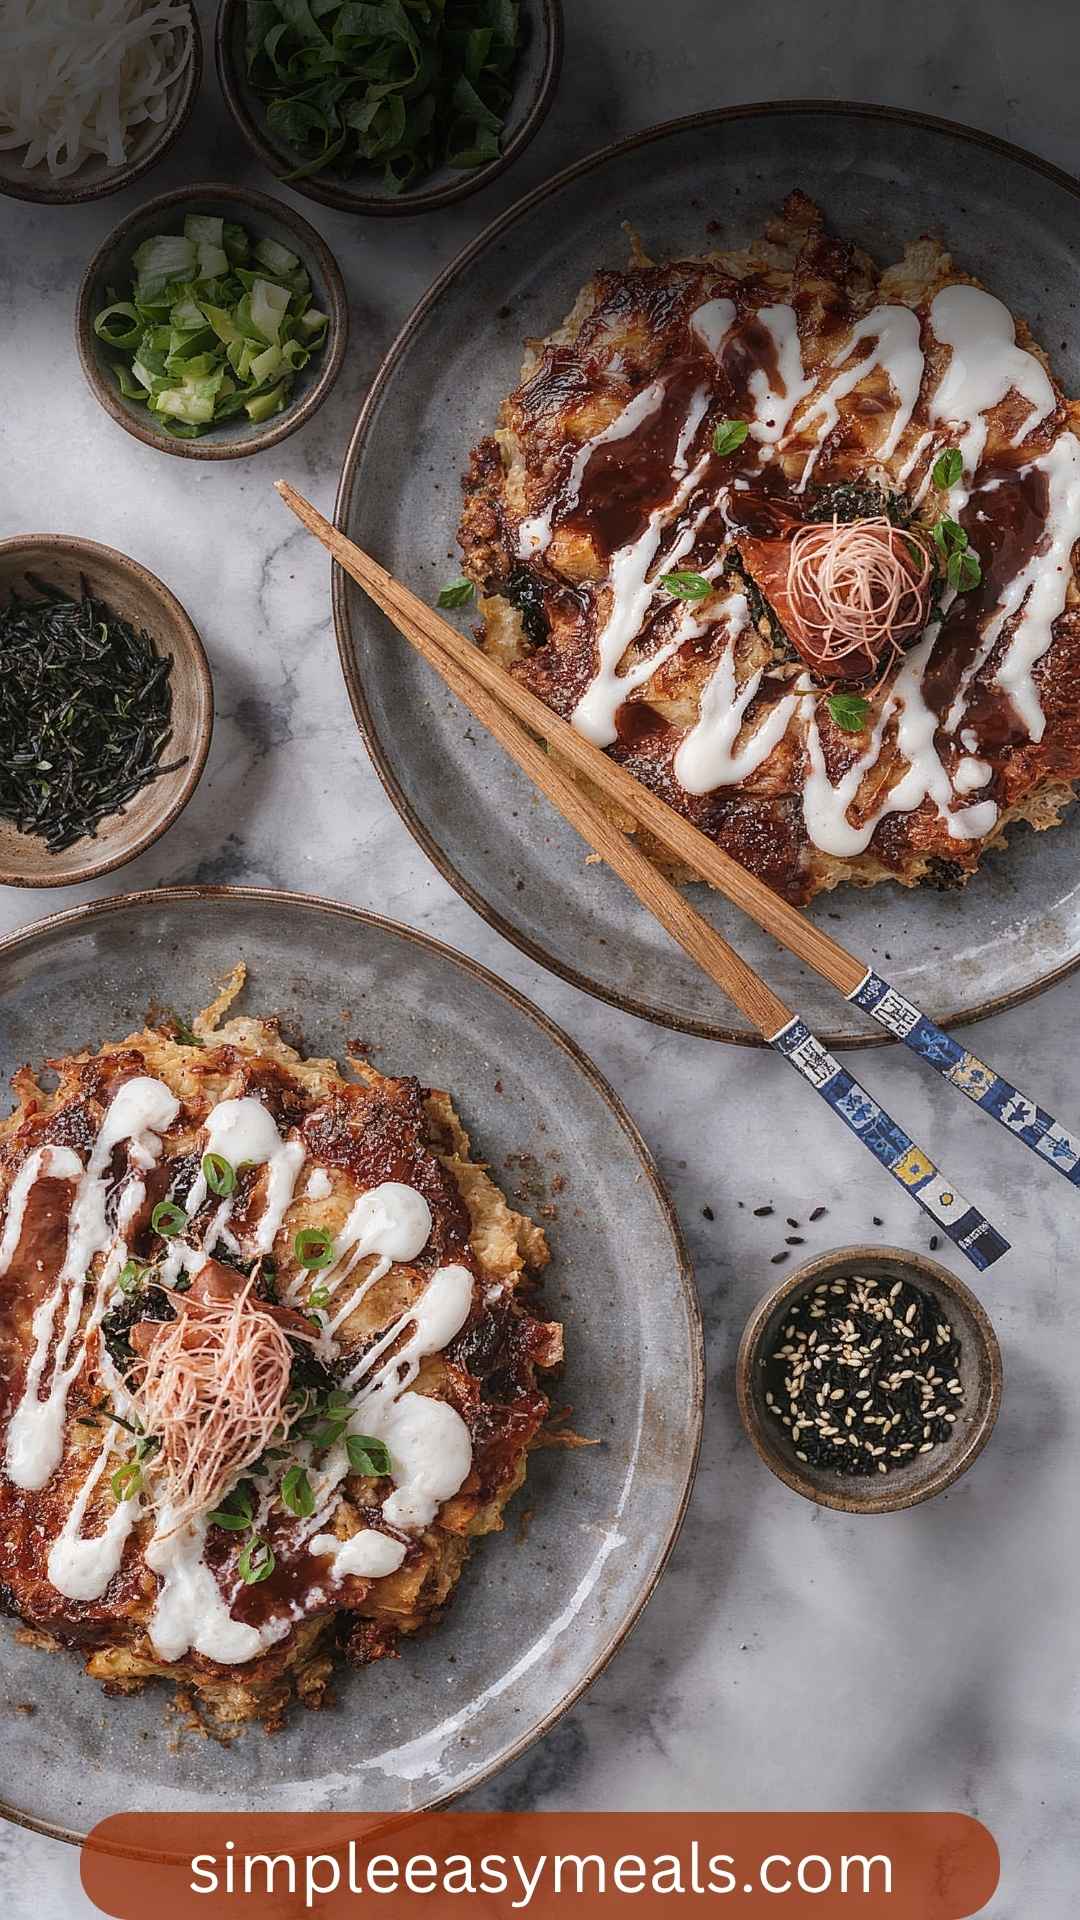
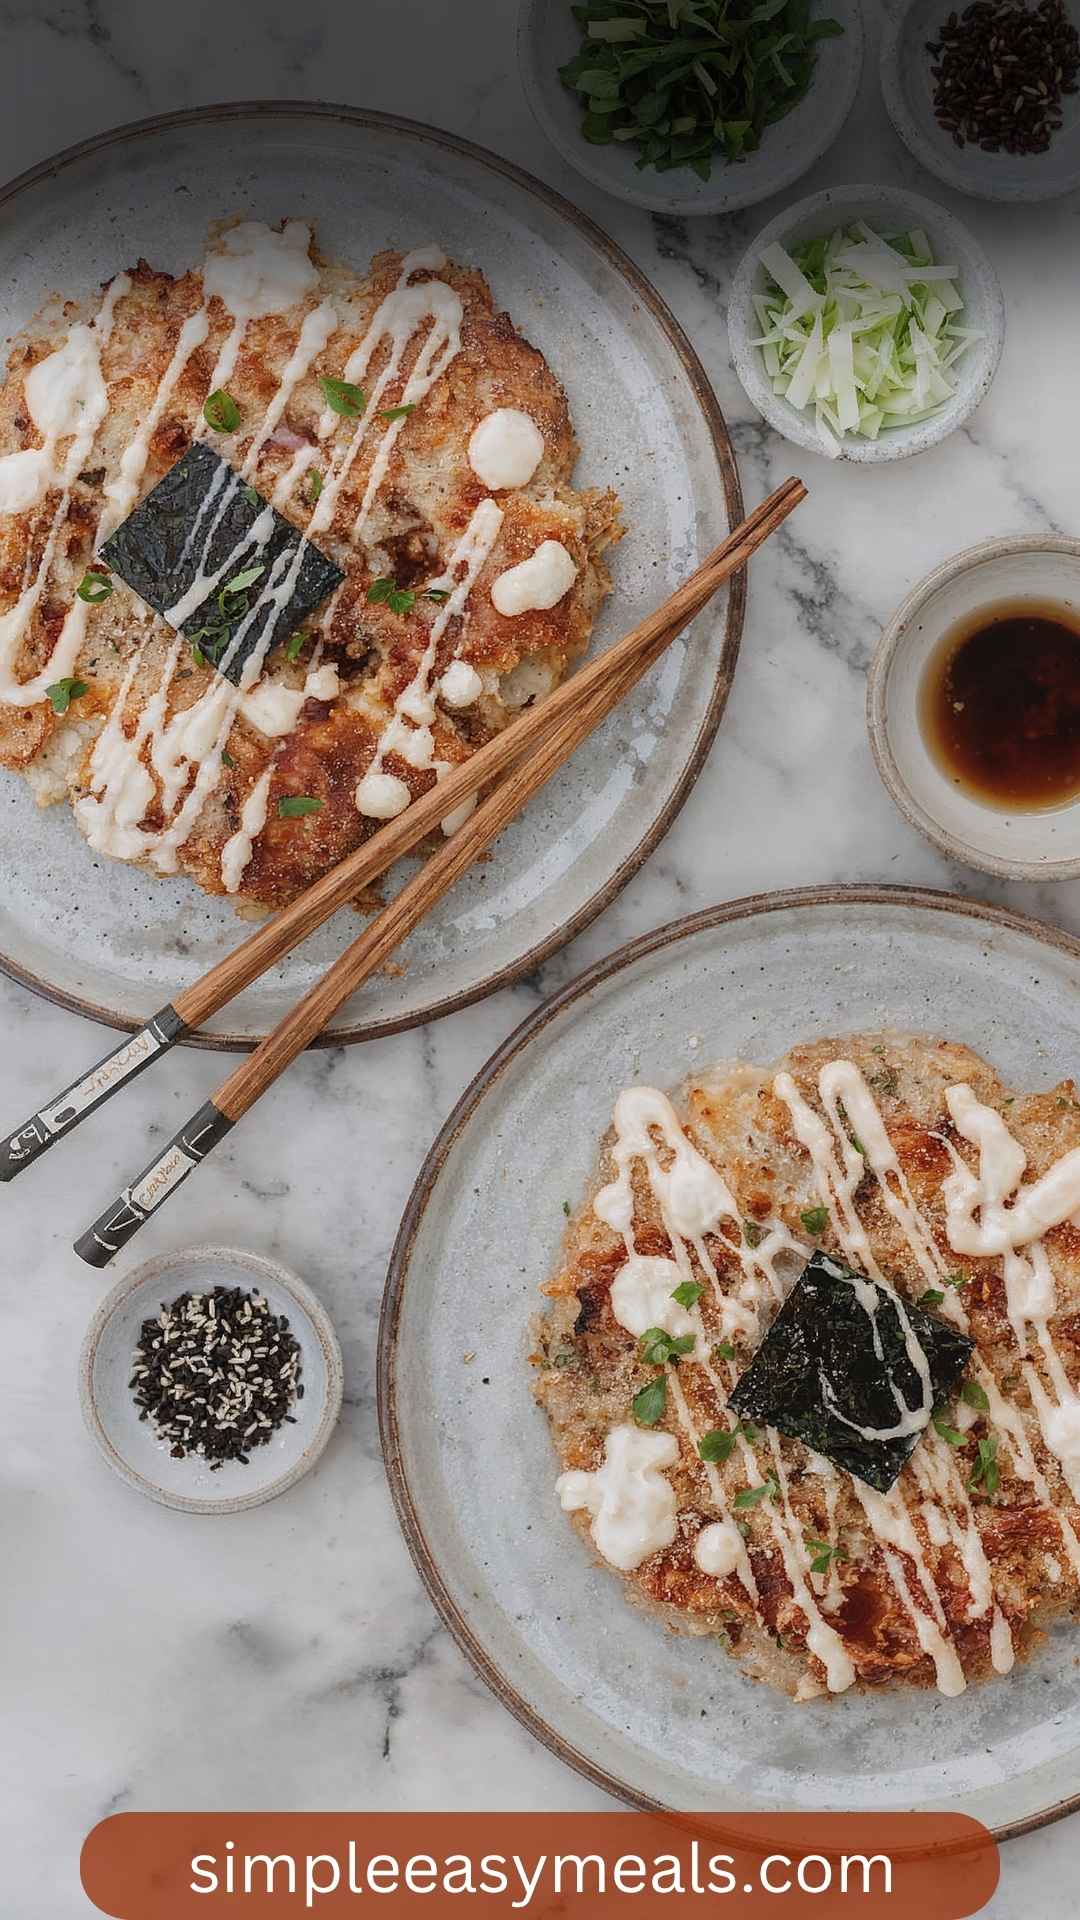
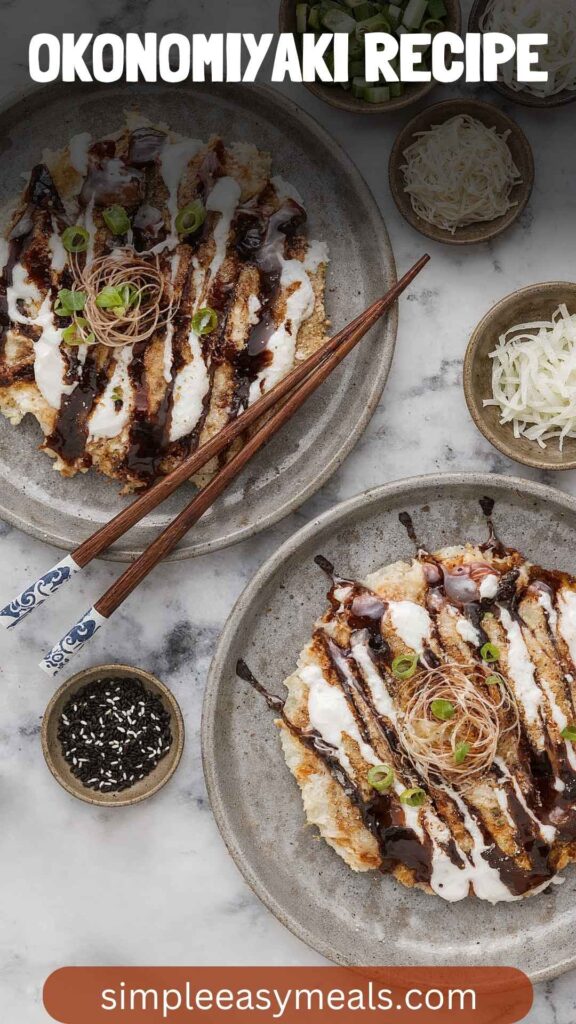
Okonomiyaki, often referred to as “Japanese pancake,” is a savory treat made primarily from flour, eggs, shredded cabbage, and various additional ingredients.
The name translates to “grilled as you like it,” which hints at the freedom you have to customize it. In Hiroshima, they prepare it differently, stacking ingredients in layers rather than mixing them all together. But in Osaka, which is where I learned to make my own, it’s all mixed up for a unique texture and flavor.
What makes okonomiyaki special is its versatility. You can throw in whatever strikes your fancy—seafood, cheese, even kimchi. With its crispy exterior and soft interior, this dish is a texture lover’s dream come true.
How Does It Taste?
Taking the first bite of okonomiyaki unleashes a symphony of flavors. The cabbage adds a slight crunch and sweetness, while the savory flavor of the batter is accentuated by whatever fillings you choose.
The mayonnaise drizzle on top adds creaminess, and a touch of okonomiyaki sauce brings an irresistible tang. It’s savory, slightly sweet, and utterly satisfying. Each mouthful is a combination of flavors that keeps you coming back for more. Trust me, you’ll be hooked.
Why You’ll Love This?
Okonomiyaki is not just food; it’s a canvas for creativity. You can make it gluten-free with the right flour, vegetarian with mixed vegetables, or meaty with pork belly or shrimp.
It’s an ideal dish for families who enjoy cooking together, as everyone can customize their own pancake. Quick to prepare and satisfying to eat, how can you not love it?
Ingredients
Gather these vibrant ingredients to embark on your okonomiyaki-making journey:
- 3 large eggs, lightly whisked
- 1 tablespoon finely grated fresh ginger for a zesty kick
- 1¼ cups thinly sliced green onions (around 1 whole bunch)
- ¾ teaspoon fine sea salt
- ½ teaspoon toasted sesame oil for nutty depth
- 3 packed cups of finely shredded green cabbage (approximately ½ of a medium head)
- Extra-virgin olive oil, for light brushing or pan greasing
- 1 cup panko-style breadcrumbs for crispy texture
These ingredients create a flavorful base that you can personalize as you see fit.
Step-by-Step Directions
Step 1: Prepare the Cabbage
Start by shredding your cabbage finely. This is a crucial step because you want the cabbage to cook down and integrate into the batter. Use a sharp knife or a box grater. Place the shredded cabbage in a large bowl, and sprinkle it with salt. This draws out excess moisture, preventing your pancake from getting soggy.
Step 2: Mix the Batter
Next, in a separate bowl, whisk together three eggs. Once they’re fluffy and well-combined, add the grated ginger and sesame oil.
Then, gradually incorporate the flour until you have a smooth batter. It shouldn’t be too thick; think of it as a pancake batter with character.
Step 3: Combine Ingredients
Now, fold the cabbage into your batter. Don’t forget to add the green onions at this stage. The mixture should be colorful and vibrant. If you’re feeling adventurous, toss in any other ingredients you desire—cooked bacon, seasoned seafood, or even sweet corn.
Step 4: Cooking Time
Heat a non-stick skillet over medium heat. Add a light drizzle of olive oil, ensuring that the entire surface is coated.
Pour half of the batter into the skillet, forming a round pancake. Cook for about 4-5 minutes on one side until it’s golden, then, flip it over using a large spatula. Cook for another 4-5 minutes until both sides are crispy. You can press it down gently to ensure even cooking.
Step 5: Put on Toppings
When it’s done, transfer the okonomiyaki to a plate. Drizzle some okonomiyaki sauce over the top, followed by a swirl of mayonnaise. You can finish with bonito flakes and a sprinkle of nori (seaweed) for that authentic touch.
Step 6: Enjoy!
Slice it up, serve hot, and watch your friends and family dig in. That’s it—your homemade okonomiyaki experience is complete!
Tips On Making Okonomiyaki Recipe
- Don’t Rush the Cooking: Allow each side to cook long enough to develop a crispy edge. Patience pays off here.
- Experiment with Fillings: Try using different proteins or veggies to find your favorite combination.
- Use a Cast Iron Skillet: This helps achieve even heat distribution, which is key for cooking the pancake thoroughly.
- Adjust the Thickness: Depending on your preference, add more or less cabbage. If you prefer a thicker pancake, pack the cabbage in tighter.
- Make it Ahead: You can prepare the batter in advance. Just avoid adding green onions until you’re ready to cook.
Nutrition Information
For a serving of okonomiyaki, you can expect approximately:
- Calories: 350
- Protein: 12g
- Fat: 20g
- Carbohydrates: 30g
- Fiber: 3g
These values can vary depending on additional toppings and ingredients.
How Do You Store This Okonomiyaki Recipe?
If you find yourself with leftovers, you’re in luck! Okonomiyaki stores quite well. Just wrap the pancakes in plastic wrap or place them in an airtight container. They can be refrigerated for about 2-3 days. When you’re ready to eat, simply reheat them in a skillet over medium heat until warmed through.
What Other Substitutes Can You Use in Okonomiyaki Recipe?
- Gluten-Free Flour: For a gluten-free option, swap regular flour for a gluten-free blend that measures like regular flour.
- Zucchini or Carrots: Want a nutrition boost? Grate some zucchini or carrots into the batter for added color and flavor.
- Kimchi: This adds a spicy twist. Chop it finely and fold it into the batter for a tangy kick.
- Tofu: For a vegetarian protein source, crumble firm tofu into your batter to give it a new texture.
- Cheese: For a richer taste, mix in shredded cheese. It melts beautifully, creating a gooey surprise.
Conclusion
Okonomiyaki is a flavor-packed, customizable dish that transforms simple ingredients into a delightful culinary experience. Whether you’re crafting it for a special occasion or a casual weekday dinner, it’s bound to impress. The steps are straightforward, and the potential for flavor is nearly limitless.
So next time you’re looking for something different, give okonomiyaki a chance. You might just find your new favorite dish. Happy cooking!
You’ll also like the following recipes!
Okonomiyaki Recipe – Simple Easy Meals
Let me take you on a culinary adventure to Japan. Imagine the sun shining, streets bustling, and the sweet aroma of grilled dishes wafting through the air. That’s where I stumbled upon okonomiyaki.
At first glance, it may look like a simple savory pancake. Yet, as you dig in, you find layers of rich taste and texture, a dish that welcomes a variety of ingredients. And the best part? You can easily recreate this dish right in your kitchen.
Ingredients
Instructions
Step 1: Prepare the Cabbage
-
Start by shredding your cabbage finely. This is a crucial step because you want the cabbage to cook down and integrate into the batter. Use a sharp knife or a box grater. Place the shredded cabbage in a large bowl, and sprinkle it with salt. This draws out excess moisture, preventing your pancake from getting soggy.
Step 2: Mix the Batter
-
Next, in a separate bowl, whisk together three eggs. Once they’re fluffy and well-combined, add the grated ginger and sesame oil.
Then, gradually incorporate the flour until you have a smooth batter. It shouldn’t be too thick; think of it as a pancake batter with character.
Step 3: Combine Ingredients
-
Now, fold the cabbage into your batter. Don’t forget to add the green onions at this stage. The mixture should be colorful and vibrant. If you’re feeling adventurous, toss in any other ingredients you desire—cooked bacon, seasoned seafood, or even sweet corn.
Step 4: Cooking Time
-
Heat a non-stick skillet over medium heat. Add a light drizzle of olive oil, ensuring that the entire surface is coated.
Pour half of the batter into the skillet, forming a round pancake. Cook for about 4-5 minutes on one side until it’s golden, then, flip it over using a large spatula. Cook for another 4-5 minutes until both sides are crispy. You can press it down gently to ensure even cooking.
Step 5: Put on Toppings
-
When it’s done, transfer the okonomiyaki to a plate. Drizzle some okonomiyaki sauce over the top, followed by a swirl of mayonnaise. You can finish with bonito flakes and a sprinkle of nori (seaweed) for that authentic touch.
Step 6: Enjoy!
-
Slice it up, serve hot, and watch your friends and family dig in. That’s it—your homemade okonomiyaki experience is complete!
Nutrition Facts
Servings 2
- Amount Per Serving
- Calories 350kcal
- % Daily Value *
- Total Fat 20g31%
- Total Carbohydrate 30g10%
- Protein 12g24%
* Percent Daily Values are based on a 2,000 calorie diet. Your daily value may be higher or lower depending on your calorie needs.
Note
- Don’t Rush the Cooking: Allow each side to cook long enough to develop a crispy edge. Patience pays off here.
- Experiment with Fillings: Try using different proteins or veggies to find your favorite combination.
- Use a Cast Iron Skillet: This helps achieve even heat distribution, which is key for cooking the pancake thoroughly.
- Adjust the Thickness: Depending on your preference, add more or less cabbage. If you prefer a thicker pancake, pack the cabbage in tighter.
- Make it Ahead: You can prepare the batter in advance. Just avoid adding green onions until you’re ready to cook.


