When it comes to finding the perfect pairing for labneh, the options are endless. A fresh plate of warm pita bread, garnished with a drizzle of olive oil and a sprinkle of za’atar.
Or how about a vibrant salad topped with crumbled feta and fresh herbs, all brought together by a generous dollop of labneh?
Serve it with seasonal veggies or alongside grilled meats to elevate your dining experience. Trust me; this Middle Eastern spread is about to become your go-to.

What is Labneh?
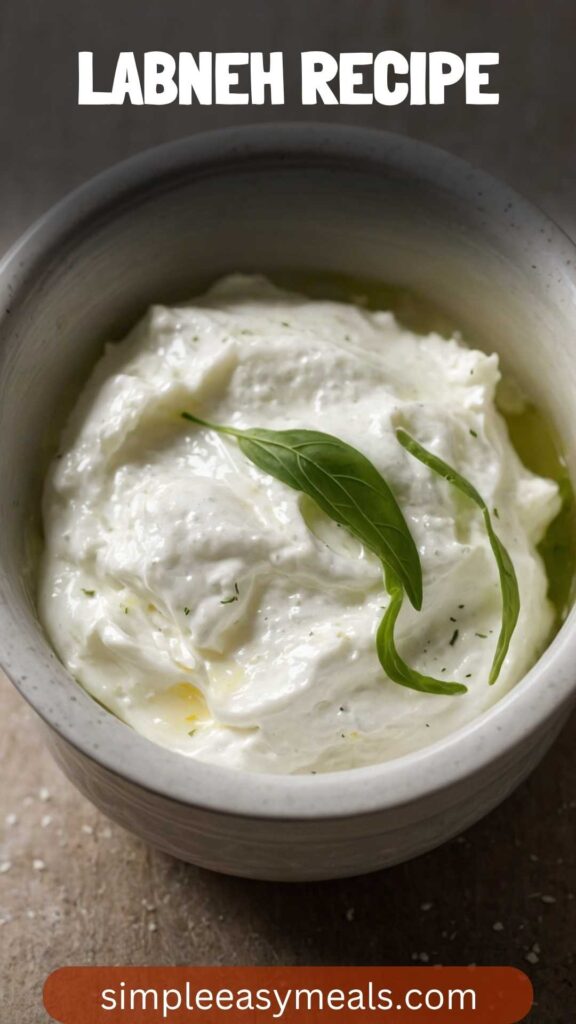
Labneh is a type of strained yogurt, that has a thick and creamy texture. Think of it as cream cheese’s lighter, tangier cousin.
Originating from the Middle East, it is commonly served as part of a mezze platter, where it’s enjoyed with pita bread, olives, and vegetables.
The process to make labneh is simple and rewarding. By straining yogurt, you remove excess whey and concentrate the flavor, resulting in a deliciously thick spread.
How Does It Taste Like?
If you’re unfamiliar, labneh has a taste that is slightly tangy, reminiscent of Greek yogurt but creamier. The flavor can vary depending on how long you strain it.
A shorter straining time results in a milder, creamier texture, while a longer straining time gives a sharper, more intense flavor. You can also customize your labneh by adding herbs or spices, making it a canvas for flavor exploration.
Why You’ll Love This!
You’ll love labneh for its versatility. Use it as a spread on sandwiches, a dip for vegetables, or even as a base for sauces.
It’s healthy—packed with protein and probiotics—making it a smart addition to any meal. Plus, home-preparation means you can adjust the flavor and texture to suit your preferences.
Ingredients
To make your own labneh at home, you’ll need the following:
- 1 tablespoon extra virgin olive oil
- 32 ounces whole milk plain yogurt
- 1/2 teaspoon freshly squeezed lemon juice
- 1/4 teaspoon fine sea salt
These ingredients are easy to find, and if you’re like me, you’ll often have them in your pantry. The olive oil adds richness, while the lemon juice gives just the right amount of acidity.

Step-by-Step Directions
Making labneh is as easy as pie, or perhaps I should say, as easy as yogurt! Here’s how to do it:
Step 1: Prepare Your Materials
First things first! Gather your materials. You’ll need a large bowl, a fine mesh strainer or cheesecloth, and a mixing spoon. A kitchen towel can also work if you don’t have cheesecloth. Make sure everything is clean and dry.
Step 2: Strain the Yogurt
Spoon the yogurt into the strainer or cheesecloth placed over the bowl. If you’re using cheesecloth, gather the sides together to form a pouch.
Leave it to strain for at least 12 hours—don’t worry; you can go about your day! I often prefer a 24-hour strain for a thicker consistency.
Step 3: Collect the Whey
As it strains, the whey will drain into the bowl below. This is a great time to think about how you’ll use this liquid gold later! It can be used in smoothies or for baking.
Step 4: Mix in the Flavorings
Once strained, add lemon juice and salt to the labneh. Stir it well to combine. This is also where you can get creative; add your favorite herbs or spices if you’re in the mood!
Step 5: Pack and Store
Spoon the labneh into an airtight container. Drizzle the top with olive oil for an added touch. This not only makes it look appetizing but keeps it fresh, too.
Tips on Making Labneh
Creating the perfect labneh can be a simple process. Here are some tips to ensure it turns out great:
- Be Patient: The straining process is key. If you rush it, you won’t achieve the right consistency.
- Experiment with Flavors: Try adding different herbs, garlic, or spices to the initial yogurt mix for unique flavors.
- Use Full-Fat Yogurt: It yields the creamiest labneh.
- Store Properly: Keep your labneh in a sealed container in the fridge. It’ll last about two weeks.
- Save the Whey: Use the leftover whey in smoothies or baking. It’s nutritious and packed with protein.
How Do You Store This Labneh?
To keep your labneh fresh, here’s how:
- Airtight Container: Transfer it into a clean, dry container that can be sealed tightly.
- Refrigeration: Labneh should be kept in the refrigerator, where it can last for about two weeks.
- Olive Oil Topper: A drizzle of olive oil on top can help preserve freshness and add flavor.
If you find your labneh is getting too thick over time, simply stir in a bit of whey or water to reach your desired consistency.
What Other Substitutes Can You Use in Labneh?
While traditional labneh uses whole milk yogurt, you can mix things up! Here are some alternatives:
- Greek Yogurt: A thicker texture that’s also packed with protein. Just be aware it may not be as tangy.
- Soy Yogurt: For a dairy-free option, this works well! Just make sure it’s unsweetened.
- Coconut Yogurt: Provides a sweeter flavor and works for those who are vegan.
- Labneh from Goat Milk: For a unique tanginess, use goat milk yogurt. It’ll shift the flavor profile quite nicely.
- Ricotta Cheese: If you’re in a pinch, this can give a different but delicious texture. Mix it with a bit of lemon juice to mimic labneh’s flavorful zing.

Conclusion
Incorporating labneh into your culinary repertoire can be incredibly rewarding. It’s easy to make and oh-so-delicious and can transform your ordinary meals into something extraordinary. Don’t be surprised when labneh becomes a staple in your kitchen!
Whether you enjoy it with fresh veggies, on toast, or as part of a larger spread, the possibilities are endless.
Trust me, after trying your hand at this delightful yogurt cheese, you’ll understand why many people keep coming back for more. Now go on, give labneh a try! You won’t regret it!
You’ll also like the following recipes!
Labneh Recipe – Simple Easy Meals
A creamy, tangy yet smooth dip that takes mere minutes to prepare but tastes like you've spent hours in the kitchen.
Enter labneh! This traditional Middle Eastern yogurt cheese is versatile and perfect for many dishes, from appetizers to desserts. Best of all, it can often be made with ingredients you already have at home.
As a registered dietitian and food enthusiast, I’ve had my fair share of store-bought dips. But time and again, I return to making labneh. In this guide, I’ll share my insights and experiences with labneh, its myriad uses, and how to create it right in your kitchen.
Ingredients
Instructions
Step 1: Prepare Your Materials
-
First things first! Gather your materials. You’ll need a large bowl, a fine mesh strainer or cheesecloth, and a mixing spoon. A kitchen towel can also work if you don't have cheesecloth. Make sure everything is clean and dry.
Step 2: Strain the Yogurt
-
Spoon the yogurt into the strainer or cheesecloth placed over the bowl. If you're using cheesecloth, gather the sides together to form a pouch.
Leave it to strain for at least 12 hours—don’t worry; you can go about your day! I often prefer a 24-hour strain for a thicker consistency.
Step 3: Collect the Whey
-
As it strains, the whey will drain into the bowl below. This is a great time to think about how you'll use this liquid gold later! It can be used in smoothies or for baking.
Step 4: Mix in the Flavorings
-
Once strained, add lemon juice and salt to the labneh. Stir it well to combine. This is also where you can get creative; add your favorite herbs or spices if you're in the mood!
Step 5: Pack and Store
-
Spoon the labneh into an airtight container. Drizzle the top with olive oil for an added touch. This not only makes it look appetizing but keeps it fresh, too.
Nutrition Facts
Servings 8
- Amount Per Serving
- Calories 63kcal
- % Daily Value *
- Total Fat 3.7g6%
- Saturated Fat 2g10%
- Cholesterol 13mg5%
- Sodium 130mg6%
- Total Carbohydrate 4g2%
- Sugars 4g
- Protein 3g6%
* Percent Daily Values are based on a 2,000 calorie diet. Your daily value may be higher or lower depending on your calorie needs.
Note
- Be Patient: The straining process is key. If you rush it, you won't achieve the right consistency.
- Experiment with Flavors: Try adding different herbs, garlic, or spices to the initial yogurt mix for unique flavors.
- Use Full-Fat Yogurt: It yields the creamiest labneh.
- Store Properly: Keep your labneh in a sealed container in the fridge. It'll last about two weeks.
- Save the Whey: Use the leftover whey in smoothies or baking. It’s nutritious and packed with protein.


