Imagine it’s a balmy summer night, and you’re serving up bowls of creamy honey ice cream. What complements this sweet treat? Think fresh fruits like sliced strawberries, peaches, or warm figs. A drizzle of caramel or a sprinkle of sea salt can heighten the flavors too. Pair it with buttery shortbread cookies or even a slice of almond cake.
For something more adventurous, serve honey ice cream alongside spicy ginger cookies or pistachio baklava. Let your guests explore these combos; honey ice cream is versatile!

What is Honey Ice Cream?
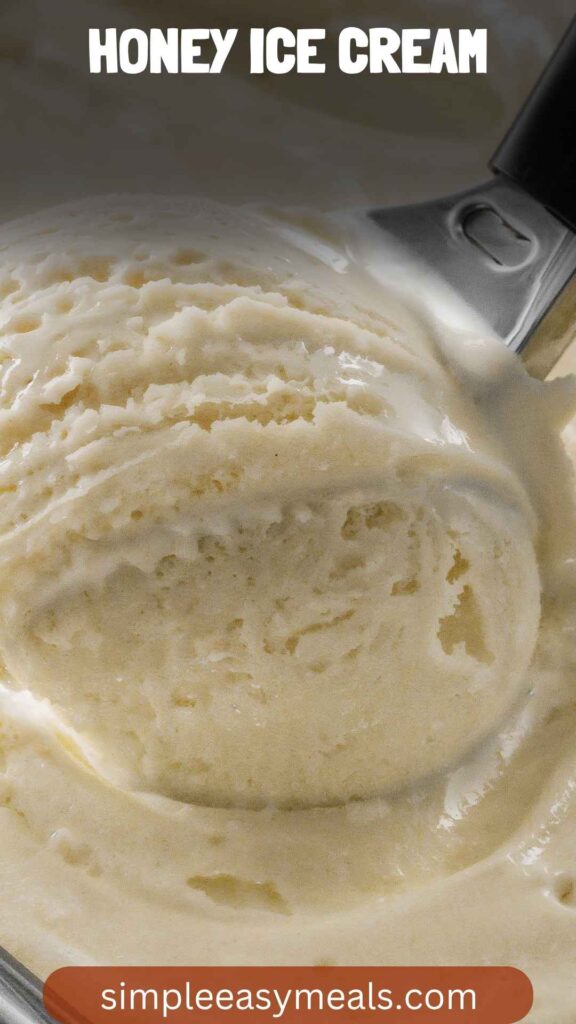
Honey ice cream is a frozen dessert that uses honey as its primary sweetener. Unlike traditional ice creams that rely heavily on granulated sugars, this delightful treat showcases the natural attributes of honey. The rich, creamy base complements the floral notes of honey, resulting in a luxurious flavor profile that you won’t forget.
There’s something special about honey. It’s ancient, steeped in history and health benefits. Honey adds depth, sweetness, and complexity that other sugars simply can’t replicate. Plus, it can be sourced locally, making your ice cream not only delicious but also a bit more sustainable!
What is the Flavor Profile of This Dish?
Dive into the flavor profile, and you’ll find layers of sweetness that dance on your taste buds. The honey provides a floral, mellow sweetness that isn’t cloying. It allows the richness of the cream and milk to shine through. The subtle warmth from the ground cardamom adds an intriguing spice, while the vanilla extract rounds out the flavors perfectly, creating a harmonious blend.
This combination creates a creamy texture with just the right amount of sweetness, leaving you wanting another scoop. Each bite is smooth and lush, making it perfect for hot days or as an elegant dessert after a hearty meal.
Why You’ll Love This?
What’s not to love? Honey ice cream is simple, yet sophisticated. It’s made with wholesome ingredients and packed with flavor. Perhaps it’s the nostalgia that makes it appealing, or maybe it’s the way it elevates everyday moments to something special.
It’s perfect for serving to guests or simply enjoying on your own after a long day. Plus, it’s easy to make, and you can tailor it to your preferences. Trust me, every scoop tells a story, and you’ll enjoy every moment of that journey.
Ingredients
To whip up this delightful treat, you will need:
- 1 tsp orange zest
- 1½ cups creamy whole milk
- 4 large golden egg yolks
- ½ cup floral honey of your choice
- ¼ tsp ground cardamom
- 1½ tsp pure vanilla extract
- 1½ cups rich heavy cream
- ½ tsp fine sea salt (or reduce to ¼ tsp for a milder touch)
These ingredients are not just random; each plays a role in creating a beautifully balanced ice cream.

Step by Step Instructions
Step 1: Prepare your Ingredients
Start by gathering all your ingredients. Make sure your milk, cream, and eggs are fresh. Quality matters here; it will reflect in your final product. Remember to zest the orange beforehand so it can infuse its oils into the mix.
Step 2: Wake the Eggs
In a separate bowl, whisk the egg yolks. You want them to lighten in color and become a bit frothy. This step ensures a lovely texture later.
Step 3: Heat the Milk and Honey
Pour the milk into a saucepan over medium heat. Add the honey. Stir until everything is well combined and warm, but not boiling. You want the honey to dissolve fully into the milk, creating a sweet, fragrant mixture.
Step 4: Temper the Eggs
Now, it’s time to combine the warm milk with your egg yolks. Slowly add a ladle of the milk mixture into the yolks while whisking continuously. This step helps prevent the eggs from cooking too quickly. After you’ve added a bit of warmth, pour the egg mixture back into the saucepan.
Step 5: Thicken the Mixture
Continue to cook the mixture over low heat, stirring constantly until it thickens just enough to coat the back of a spoon. This step is crucial as it creates a custard-like base which adds richness to the ice cream.
Step 6: Add Cream and Flavorings
Now, remove the saucepan from the heat. Stir in the heavy cream, cardamom, vanilla, orange zest, and salt. Give it a good mix and let it cool.
Step 7: Chill the Mixture
Transfer your mixture to a bowl. Cover it with plastic wrap, making sure it touches the surface to prevent a film from forming. Let it chill in the refrigerator for at least 4 hours, preferably overnight.
Step 8: Churn the Ice Cream
Once your mixture is chilled, it’s time to churn it in your ice cream maker. Follow the manufacturer’s instructions. The ice cream should become thick and creamy, usually after about 20 to 30 minutes.
Step 9: Freeze Until Firm
Transfer the churned ice cream to an airtight container. Freeze it for at least 2 hours to firm it up. The waiting will be tough, but the end result will be worth it!
Tips & Tricks
To enhance your honey ice cream experience, consider the following:
- Use Local Honey: It’s fresher and has unique flavor profiles based on regional flowers.
- Opt for High-Quality Cream: This will create a silkier texture in your ice cream.
- Experiment with Extracts: Try almond or hazelnut extracts for different flavor dimensions.
- Add Mix-Ins: Consider folding in nuts, chocolate chips, or chunks of fruit during the last few minutes of churning.
- Let It Rest: After churning, it helps to let the ice cream sit at room temperature for a few minutes before scooping. It makes serving easier!
Nutrition Information
A serving (1/2 cup) of honey ice cream contains approximately:
- Calories: 310
- Total Fat: 22g
- Saturated Fat: 13g
- Cholesterol: 130mg
- Sodium: 55mg
- Total Carbohydrates: 30g
- Dietary Fiber: 0g
- Sugars: 20g
- Protein: 4g
Keep in mind this ice cream is rich and decadent due to the cream and egg yolks, but treats are all about balance. Enjoy occasionally and savor every bite!
How Can You Store This Honey Ice Cream?
To maximize freshness, keep your honey ice cream in an airtight container. For best results, keep it in the back of your freezer where the temperature is most consistent. It’s wise to let it sit out for a few minutes before scooping, as homemade ice creams can develop harder textures if left frozen for long periods.
Ingredient Substitutions
Perhaps you’re missing a few items? Fear not! Here are some alternatives:
- Honey: If honey isn’t available, maple syrup can work, although the flavor will you give a different dimension.
- Cream: Instead of heavy cream, use coconut cream for a dairy-free twist; it brings richness while offering a tropical touch.
- Egg Yolks: If you’d prefer not to use egg yolks, consider cornstarch as a thickener; mix two tablespoons with the milk.

Conclusion
Honey ice cream is more than just a dessert; it’s a slice of joy in a bowl. It’s creamy, flavorful, and downright comforting. The steps to making it are simple, and the rewards are plentiful. You can impress your friends or delight your family with a homemade treat that feels fancy without breaking a sweat in the kitchen.
As you savor each spoonful, you’re not just enjoying a dessert. You’re relishing a moment, a memory, and a touch of sweetness that makes life a little better. Whether you’re lounging on a sunny patio or hosting a gathering, this honey ice cream recipe is bound to be a hit. So, go ahead—treat yourself!
You’ll also like the following recipes!
Honey Ice Cream – Simple Easy Meals
Honey ice cream is not just a dessert; it’s an experience. It evokes memories of sun-kissed picnics and long summer evenings. I remember the first time I tasted this heavenly concoction. It was at a quaint village gelateria in Tuscany.
The moment that cool, creamy scoop melted in my mouth, I knew I had to recreate it at home. This blog post will take you through this culinary journey, exploring the beauty of honey ice cream.
Ingredients
Instructions
Step 1: Prepare your Ingredients
-
Start by gathering all your ingredients. Make sure your milk, cream, and eggs are fresh. Quality matters here; it will reflect in your final product. Remember to zest the orange beforehand so it can infuse its oils into the mix.
Step 2: Wake the Eggs
-
In a separate bowl, whisk the egg yolks. You want them to lighten in color and become a bit frothy. This step ensures a lovely texture later.
Step 3: Heat the Milk and Honey
-
Pour the milk into a saucepan over medium heat. Add the honey. Stir until everything is well combined and warm, but not boiling. You want the honey to dissolve fully into the milk, creating a sweet, fragrant mixture.
Step 4: Temper the Eggs
-
Now, it's time to combine the warm milk with your egg yolks. Slowly add a ladle of the milk mixture into the yolks while whisking continuously. This step helps prevent the eggs from cooking too quickly. After you’ve added a bit of warmth, pour the egg mixture back into the saucepan.
Step 5: Thicken the Mixture
-
Continue to cook the mixture over low heat, stirring constantly until it thickens just enough to coat the back of a spoon. This step is crucial as it creates a custard-like base which adds richness to the ice cream.
Step 6: Add Cream and Flavorings
-
Now, remove the saucepan from the heat. Stir in the heavy cream, cardamom, vanilla, orange zest, and salt. Give it a good mix and let it cool.
Step 7: Chill the Mixture
-
Transfer your mixture to a bowl. Cover it with plastic wrap, making sure it touches the surface to prevent a film from forming. Let it chill in the refrigerator for at least 4 hours, preferably overnight.
Step 8: Churn the Ice Cream
-
Once your mixture is chilled, it’s time to churn it in your ice cream maker. Follow the manufacturer’s instructions. The ice cream should become thick and creamy, usually after about 20 to 30 minutes.
Step 9: Freeze Until Firm
-
Transfer the churned ice cream to an airtight container. Freeze it for at least 2 hours to firm it up. The waiting will be tough, but the end result will be worth it!
Nutrition Facts
Servings 4
- Amount Per Serving
- Calories 310kcal
- % Daily Value *
- Total Fat 22g34%
- Saturated Fat 13g65%
- Cholesterol 130mg44%
- Sodium 55mg3%
- Total Carbohydrate 30g10%
- Sugars 20g
- Protein 4g8%
* Percent Daily Values are based on a 2,000 calorie diet. Your daily value may be higher or lower depending on your calorie needs.
Note
- Use Local Honey: It’s fresher and has unique flavor profiles based on regional flowers.
- Opt for High-Quality Cream: This will create a silkier texture in your ice cream.
- Experiment with Extracts: Try almond or hazelnut extracts for different flavor dimensions.
- Add Mix-Ins: Consider folding in nuts, chocolate chips, or chunks of fruit during the last few minutes of churning.
- Let It Rest: After churning, it helps to let the ice cream sit at room temperature for a few minutes before scooping. It makes serving easier!


