Ah, the grilled cheese sandwich. It brings me back to my childhood—those cozy afternoons with melted cheese oozing from between two crispy slices of bread.
When I first stumbled upon the Jane the Virgin grilled cheese sandwich, I was immediately intrigued. Inspired by the hit show, this sandwich embodies comfort and flavor, making it standout from the mundane.
Drawing from the show’s vibrant narrative, this recipe brings not just a meal, but a memory. It’s simple yet sophisticated, and I cannot wait to guide you through the process of creating your own. Let’s get to it!

Why This Recipe Works?
Here’s why the Jane the Virgin grilled cheese sandwich is a must-try!
1. Perfect Cheese Blend: Utilizing once creamier aged cheddar, sharp vintage cheddar, and fresh mozzarella creates a delightful combination. This mix not only enhances the flavor but also provides the perfect melt.
2. Flavor Pinnacle: With the addition of Kewpie mayonnaise and a hint of Dijon, this sandwich ascends to new heights. These ingredients bring a subtle tang and depth that transforms an ordinary grilled cheese into something extraordinary.
3. Adjustable Ingredients: The beauty of this recipe lies in its flexibility. Whether you want to switch up the bread or add veggies, you can personalize this dish to your liking.
4. Easy and Quick: This is a dish you can whip up on a busy weekday evening. It requires minimal preparation and cooks quickly, making it effortless for any home cook.
How Does It Taste Like?
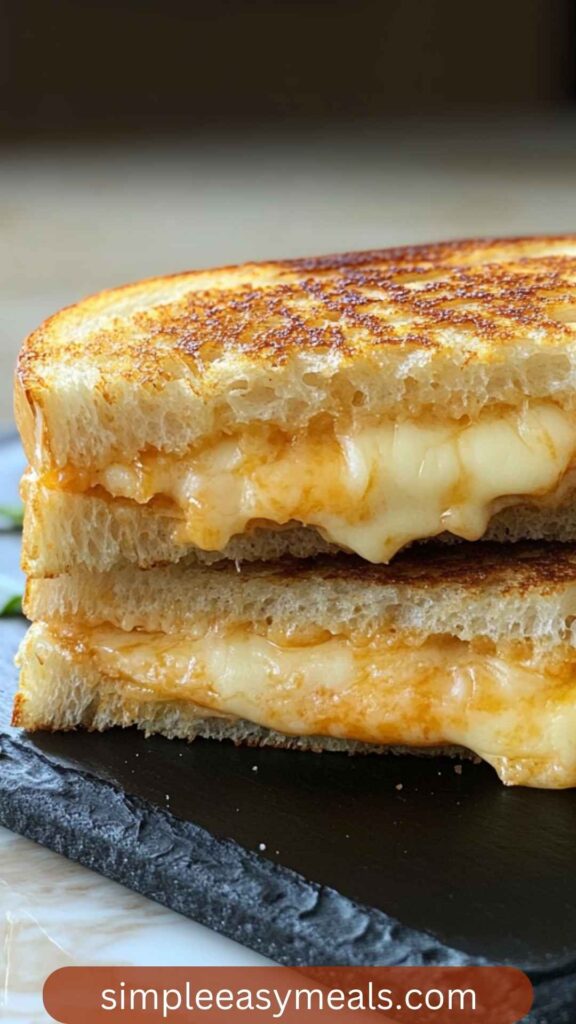
Imagine biting into a perfectly grilled sandwich. The outer layer crunches lightly, giving way to a warm, gooey center. Each cheese complements the others—creamy, sharp, and slightly salty, all at once. There’s a subtle tang from the dijon that brightens the mouthfeel. You’ll be left wanting another bite with every chew.
What Sets This Recipe Apart?
This grilled cheese sandwich stands apart due to its inspired components. Unlike typical recipes, which might rely solely on one type of cheese, this version celebrates a blend that creates complexity.
The addition of Kewpie mayonnaise is another marker of distinction. It was the moment I realized this was more than an ordinary sandwich. You get to enjoy layers of flavor, rather than just one note singing alone.
The Ingredients
Here’s what you’ll need to create this scrumptious dish:
- 1 tablespoon of chopped fresh chives
- 2 slices of hearty ciabatta bread
- Softened, salted butter (at room temperature, for spreading)
- Creamy aged cheddar cheese
- Sharp vintage cheddar cheese
- Fresh mozzarella cheese
- Shredded American and Monterey Jack cheese (best substitute for American cheese)
- Kewpie mayonnaise (or any preferred mayonnaise)
- A hint of Dijon mustard
- 1 teaspoon of garlic powder

Instructions
Follow these steps to prepare your sandwich.
Step 1: Prepare Your Ingredients
Gather all your ingredients and let the butter soften at room temperature if you haven’t done this already. Slice the cheeses if needed, and set aside the chives.
Step 2: Mix the Spreads
In a small bowl, combine the Kewpie mayonnaise with a smidgen of Dijon mustard and garlic powder. This will be the zesty spread that sets this grilled cheese apart.
Step 3: Assemble the Sandwich
On one slice of ciabatta, spread a generous layer of the zesty mayo mixture. Next, layer on the creamy aged cheddar, sharp vintage cheddar, and fresh mozzarella. Sprinkle the chopped chives for an aromatic touch. Top with the second slice of ciabatta.
Step 4: Butter the Bread
Spread a thin layer of softened, salted butter on the outside of the sandwich. This is crucial as it creates the golden crust you crave.
Step 5: Heat the Pan
Place a skillet over medium heat. Once it’s warmed, carefully place your sandwich in the skillet. Cook for 3-4 minutes or until golden brown, then flip.
Step 6: Cook the Other Side
Butter the other side if necessary. Cook for another 3-4 minutes until the bread is beautifully toasted and the cheese has melted. If the cheese is not quite melted, you can reduce the heat and cover the skillet for a minute or two.
Step 7: Serve and Enjoy
Once removed from the skillet, allow for a minute of cooling before slicing. Serve with your choice of side!
Notes
Here are some tips to enhance your cooking experience:
- Slicing Cheese: Prefer to slice your cheese thicker for a more indulgent sandwich, or thinner for lighter bites.
- Experiment with Bread: Feel free to swap hard ciabatta for a softer bread like sourdough. The texture will change, but the deliciousness will remain.
- Adding Veggies: Want a twist? Consider adding sliced tomatoes or spinach inside the sandwich.
- Pan Alternatives: You can use a cast iron skillet for an evenly cooked, crispy crust.
- Watch the Heat: Keep a close eye on your sandwich throughout cooking. Adjust the heat if necessary to avoid burning.
Nutrition Information
jane the virgin grilled cheese sandwich recipe nutrition facts
How Do You Store This?
Leftover sandwiches? Simply wrap them in foil or store in an airtight container in the refrigerator. They can be reheated in a toaster oven or skillet for best results.
Sides for Jane the Virgin Grilled Cheese Sandwich
When serving this delicious sandwich, consider these sides:
1. Tomato Basil Soup:
You’ll find that this classic goes hand in hand with grilled cheese. The creamy, tomato base is comforting and pairs well with the sandwich’s flavor. It’s a classic comfort food combination with a reason behind its popularity.
2. Crispy Kale Chips:
For something crunchy and healthy, kale chips provide a fantastic alternative to regular potato chips. Toss with olive oil, sprinkle with salt, and bake until crispy. A nutritious complement to your main dish.
3. Pickles or Pickled Vegetables:
A tangy crunch can elevate the sandwich. The acidity cuts through the richness of the cheeses and adds a punchy bite that leaves your taste buds dancing.
What Alternatives Can You Use for the Ingredients?
Don’t have all the ingredients? No problem! Here are some alternatives:
1. Breads:
If ciabatta is not available, any high-quality bread works. Try sourdough or whole grain for different textures and flavors.
2. Cheese Choices:
If you’re out of mozzarella, provolone or gouda are excellent substitutes. Each brings a unique twist to the flavor palate.
3. Mayonnaise Substitutes:
Regular mayonnaise or even Greek yogurt can work well as base spreads. Adjust the seasoning accordingly.
4. Seasonings:
Don’t have garlic powder? You can use fresh minced garlic for a stronger taste.
Conclusion
Crafting the Jane the Virgin grilled cheese sandwich is about much more than just lunch. It’s a dive into comfort food, nostalgia, and creativity. By mixing and matching flavors, you can find the version that resonates most with your palate.
Whether it’s paired with a sumptuous soup or enjoyed solo, this sandwich is destined to become a beloved staple in your kitchen. So, grab your ingredients and fire up that skillet—you’re in for a treat!
You’ll also like the following recipes!
Jane the Virgin Grilled Cheese Sandwich Recipe – Simple Easy Meals
Grilled cheese sandwiches are incredibly versatile, and the Jane the Virgin grilled cheese is no exception. To elevate this delightful dish, consider pairing it with a few classic sides and drinks.
First and foremost, you can't go wrong with tomato soup; the rich, melty cheese complements the acidity of a smooth, creamy bisque perfectly, creating a comforting duo that’s hard to beat. For a fresher touch, a crisp arugula salad with lemon vinaigrette adds brightness and balances the sandwich’s richness, with the peppery notes of arugula refreshing your palate.
If you’re in the mood for some crunch, a handful of your favorite potato chips or tortilla chips provides a satisfying texture that complements the gooey cheese. With these pairings, you’re all set to dive into the delicious journey that is the Jane the Virgin grilled cheese sandwich!

Ingredients
Instructions
Step 1: Prepare Your Ingredients
-
Gather all your ingredients and let the butter soften at room temperature if you haven't done this already. Slice the cheeses if needed, and set aside the chives.
Step 2: Mix the Spreads
-
In a small bowl, combine the Kewpie mayonnaise with a smidgen of Dijon mustard and garlic powder. This will be the zesty spread that sets this grilled cheese apart.
Step 3: Assemble the Sandwich
-
On one slice of ciabatta, spread a generous layer of the zesty mayo mixture. Next, layer on the creamy aged cheddar, sharp vintage cheddar, and fresh mozzarella. Sprinkle the chopped chives for an aromatic touch. Top with the second slice of ciabatta.
Step 4: Butter the Bread
-
Spread a thin layer of softened, salted butter on the outside of the sandwich. This is crucial as it creates the golden crust you crave.
Step 5: Heat the Pan
-
Place a skillet over medium heat. Once it’s warmed, carefully place your sandwich in the skillet. Cook for 3-4 minutes or until golden brown, then flip.
Step 6: Cook the Other Side
-
Butter the other side if necessary. Cook for another 3-4 minutes until the bread is beautifully toasted and the cheese has melted. If the cheese is not quite melted, you can reduce the heat and cover the skillet for a minute or two.
Step 7: Serve and Enjoy
-
Once removed from the skillet, allow for a minute of cooling before slicing. Serve with your choice of side!
Nutrition Facts
Servings 1
- Amount Per Serving
- Calories 541kcal
- % Daily Value *
- Total Fat 35.7g55%
- Saturated Fat 21.9g110%
- Cholesterol 101mg34%
- Sodium 925mg39%
- Total Carbohydrate 23g8%
- Dietary Fiber 1g4%
- Sugars 1g
- Protein 32g64%
* Percent Daily Values are based on a 2,000 calorie diet. Your daily value may be higher or lower depending on your calorie needs.
Note
- Slicing Cheese: Prefer to slice your cheese thicker for a more indulgent sandwich, or thinner for lighter bites.
- Experiment with Bread: Feel free to swap hard ciabatta for a softer bread like sourdough. The texture will change, but the deliciousness will remain.
- Adding Veggies: Want a twist? Consider adding sliced tomatoes or spinach inside the sandwich.
- Pan Alternatives: You can use a cast iron skillet for an evenly cooked, crispy crust.
- Watch the Heat: Keep a close eye on your sandwich throughout cooking. Adjust the heat if necessary to avoid burning.


