When summer rolls around, nothing sets the mood for a casual gathering quite like a cheese board. Picture this: you and your friends sipping on chilled wine, laughing under the sun, with a beautifully arranged cheese board laid out before you.
The combination of textures and flavors invites everyone to dig in, making it easy to bond over shared tastes and timeless recipes. Whether it’s a casual picnic in the park or a more elegant evening affair, a cheese board pairs excellently with light wine and good conversation.

Cheese boards have become a staple for gatherings, and for good reason. They’re effortless yet elegant, combining a variety of flavors and textures into one enticing platter. Perfect for summer BBQs or holiday celebrations, this dish satisfies all palates.
What I love about cheese boards is their versatility; you can customize them to include seasonal ingredients, accommodate dietary preferences, and highlight your favorite ingredients. In this post, I’ll walk you through my tried-and-true method for assembling a cheese board that dazzles the senses.
You Might Like These Recipes!
How I have used the ingredients in this recipe?
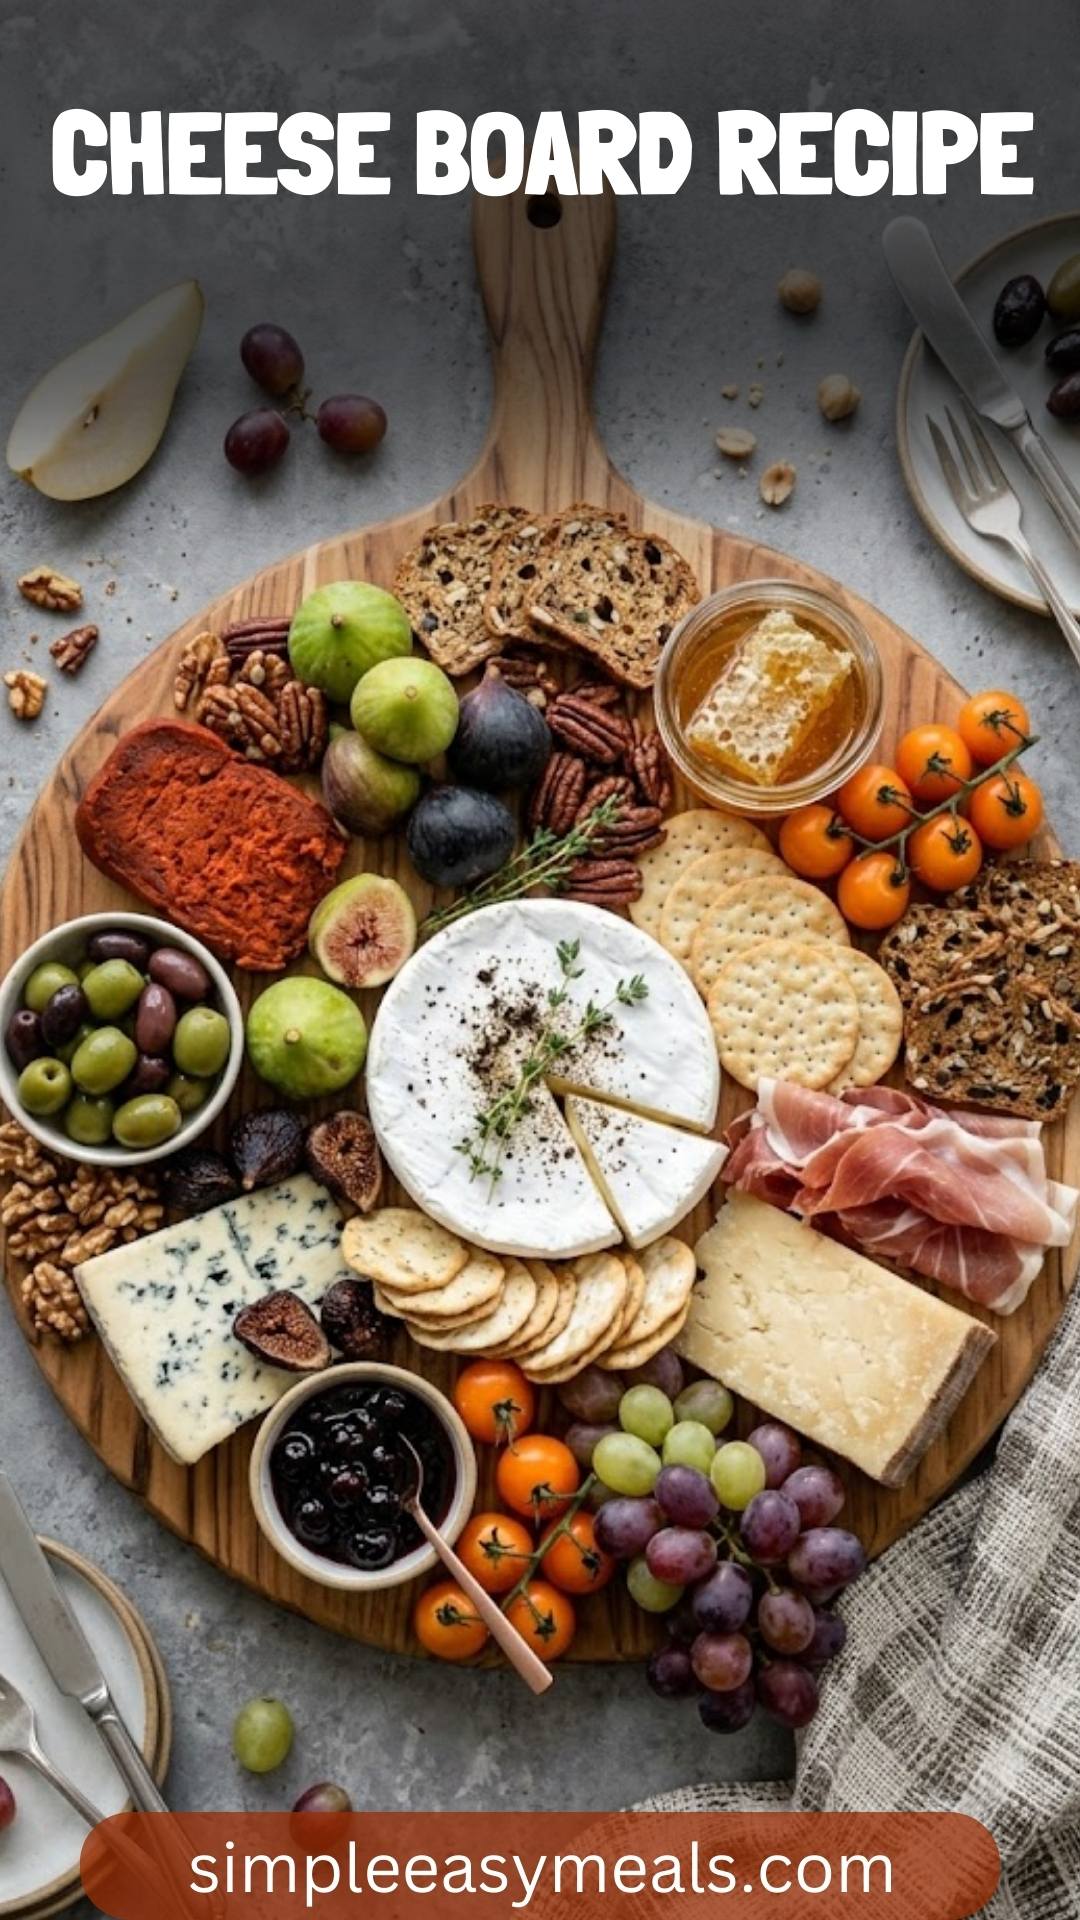
In creating this cheese board, I’ve chosen a delightful variety of ingredients that balance flavors and create a feast for the eyes. First, I selected cheeses that range from sharp to creamy, giving an interesting taste experience. Next, I added cured meats to bring in delicious umami flavors. To elevate the board further, I included both savory and sweet accompaniments—nuts and pickled vegetables for saltiness, complemented by fresh fruits and a dash of sweetness. Finally, light crackers round out the textures, ensuring every bite is a blend of delightful surprises.
The Ingredients

– Cheeses (Choose 3, 5, or 7, depending on party size):
– Hard cheeses: Gouda, cheddar, Gruyere, or Parmesan
– Soft cheeses: Brie, goat cheese, or double-cream cheese
– Meats:
– Selection of cured meats like prosciutto, salami, or chorizo
– Savory Accompaniments:
– Nuts: Candied pecans, almonds, or walnuts
– Pickled items: Cornichons, dill pickles, or olives
– Dips and spreads: Hummus, whole grain mustard, or a spicy romesco
– Optional veggies: Cherry tomatoes or baby carrots for crunch
– Sweet Accompaniments:
– Fresh fruits: Grapes, strawberries, or apple slices
– Dried fruits: Figs or apricots
– Sweet spreads: Fig jam, honey, or orange marmalade
– Chocolate: A few pieces of quality dark chocolate
– Crackers:
– Pita crackers, whole grain crackers, or toasted baguette slices
Ingredients From : tastesbetterfromscratch.com
How to make cheese board recipe?
Creating a stunning cheese board is straightforward and fun. Each step helps you build a visually appealing and delicious spread, so let’s roll up our sleeves and get to it!
Step-by-step directions
Step 1: Choose Your Board

Begin by selecting a board that suits your gathering size. A wooden cutting board or a large platter works beautifully. If you think you need more space to showcase your ingredients, don’t hesitate to use multiple boards!
Step 2: Anchor with Cheese

The cheese is the star of the show. Pick an odd number of cheese types—three, five, or seven—depending on how many people you’re serving. Arrange the cheeses around the board first. To make them visually appealing, feel free to cut some into wedges or leave others whole.
Step 3: Arrange the Meats

Next, it’s time for the cured meats. Fold each slice of meat in half, and then again into quarters. Fan them out like a delicate deck of cards or arrange them in ribbons for lighter options like prosciutto. This quick preparation allows for easy grabbing, ensuring your guests can enjoy them effortlessly.
Step 4: Add Savory Accompaniments

Now comes the fun part—layering on those savory accompaniments. Position your nuts, pickled items, and dips in strategic spots across the board. Think about color; vibrant olives or crunchy vegetables draw the eye, so place them near your cheeses for an inviting contrast.
Step 5: Introduce Sweet Elements

Place your fresh fruits and dried fruits around the board, creating clusters that offer a pop of color and natural sweetness. Pair them with soft cheeses, as this contrast elevates the experience. For example, enjoy strawberries alongside creamy brie, or dried figs with goat cheese for a delightful balance.
Step 6: Fill Gaps with Crackers and Extras
Finally, fill in any extra spaces with an assortment of crackers. You might offer a variety to accommodate different textures. Additionally, add in any remaining nuts or fruit to complete the look. By the time you’re finished, the board should be a colorful mosaic of ingredients that beckon everyone to enjoy!
Recipe Notes
– Quality Matters: Choose high-quality cheese and meats for the best flavor.
– Seasonal Touch: Incorporate seasonal fruits and veggies to keep the board fresh.
– Make Ahead: You can prep most ingredients a day in advance. Just assemble right before serving to maintain freshness.
– Avoid Overcrowding: Less can be more. Leave some breathing space on the board to make it more inviting and accessible.
– Theme It Up: With holidays, try sprigs of rosemary or seasonal fruits to elevate the look.
Storage Tips
Storing a cheese board correctly is crucial for keeping everything fresh and tasty. If you find there are leftovers, wrap individual components separately. Cover soft cheeses with plastic wrap to maintain moisture, while hard cheeses can go into an airtight container. Store meats in cooler temperatures. Most accompaniments should also be refrigerated, but check the individual storage requirements of items like nuts or crackers for the best shelf life.
Serving Suggestions
– Wine Pairing: Pair your cheese board with a light white or a refreshing rosé.
– Cocktail Flavor: Add a shrub or a spritzer for a delightful bubbly complement.
– Educational Touch: Share stories behind your cheese selections as conversation starters.
– Variety on the Side: Provide small plates for guests to build their own personalized servings.
– Interactive Fun: Offer small skewers for a hands-on snacking experience!
What other substitutes can I use in cheese board recipe?
– Cheese Substitutes: Go for aged cheddar instead of gouda, or try feta in place of goat cheese.
– Meat Variations: Substitute turkey slices or smoked salmon for a lighter option.
– Nuts Alternatives: Use sunflower seeds or pumpkin seeds in place of nuts for nut-free options.
– Sweet Spread Alternatives: Try agave syrup or honey in place of jam to drizzle over cheese.
– Cracker Options: Use gluten-free crackers or veggie chips to keep it friendly for all diets.
Conclusion
A well-crafted cheese board can elevate any gathering into an enjoyable experience. With startling colors, flavors, and textures, it encourages mingling and ignites conversations. Even if you’re new to cheese boards, remember it’s all about balance and discovering fun combinations.
Gathering your favorite cheeses, meats, and accompaniments is all part of the adventure. So grab your favorite board, pick your ingredients, and let your creativity flow; your guests will be thrilled, and you’ll feel like a culinary wizard! Happy cheesing!
You Might Also Like These Latest Recipes!
Cheese Board Recipe – Simple Easy Meals
Ingredients
Method
- Begin by selecting a board that suits your gathering size. A wooden cutting board or a large platter works beautifully. If you think you need more space to showcase your ingredients, don’t hesitate to use multiple boards!
- The cheese is the star of the show. Pick an odd number of cheese types—three, five, or seven—depending on how many people you’re serving. Arrange the cheeses around the board first. To make them visually appealing, feel free to cut some into wedges or leave others whole.
- Next, it’s time for the cured meats. Fold each slice of meat in half, and then again into quarters. Fan them out like a delicate deck of cards or arrange them in ribbons for lighter options like prosciutto. This quick preparation allows for easy grabbing, ensuring your guests can enjoy them effortlessly.
- Now comes the fun part—layering on those savory accompaniments. Position your nuts, pickled items, and dips in strategic spots across the board. Think about color; vibrant olives or crunchy vegetables draw the eye, so place them near your cheeses for an inviting contrast.
- Place your fresh fruits and dried fruits around the board, creating clusters that offer a pop of color and natural sweetness. Pair them with soft cheeses, as this contrast elevates the experience. For example, enjoy strawberries alongside creamy brie, or dried figs with goat cheese for a delightful balance.
- Finally, fill in any extra spaces with an assortment of crackers. You might offer a variety to accommodate different textures. Additionally, add in any remaining nuts or fruit to complete the look. By the time you’re finished, the board should be a colorful mosaic of ingredients that beckon everyone to enjoy!